| 本文档讲述内容与代码示例可参见 Shoulder-Demo2 |
能力激活方式:
<dependency>
    <groupId>cn.itlym</groupId>
    <artifactId>shoulder-batch</artifactId>
</dependency>compile 'cn.itlym:shoulder-batch'导入 & 导出
导入导出功能是专业级应用程序的进阶功能,Shoulder 已经完成了这项工作的绝大部分工作量,您只需要在应用配置文件中定义你需要操作的模型和处理逻辑即可。
shoulder.batch.export-file-config-locations: classpath:exportFileConfig.jsonshoulder:
batch:
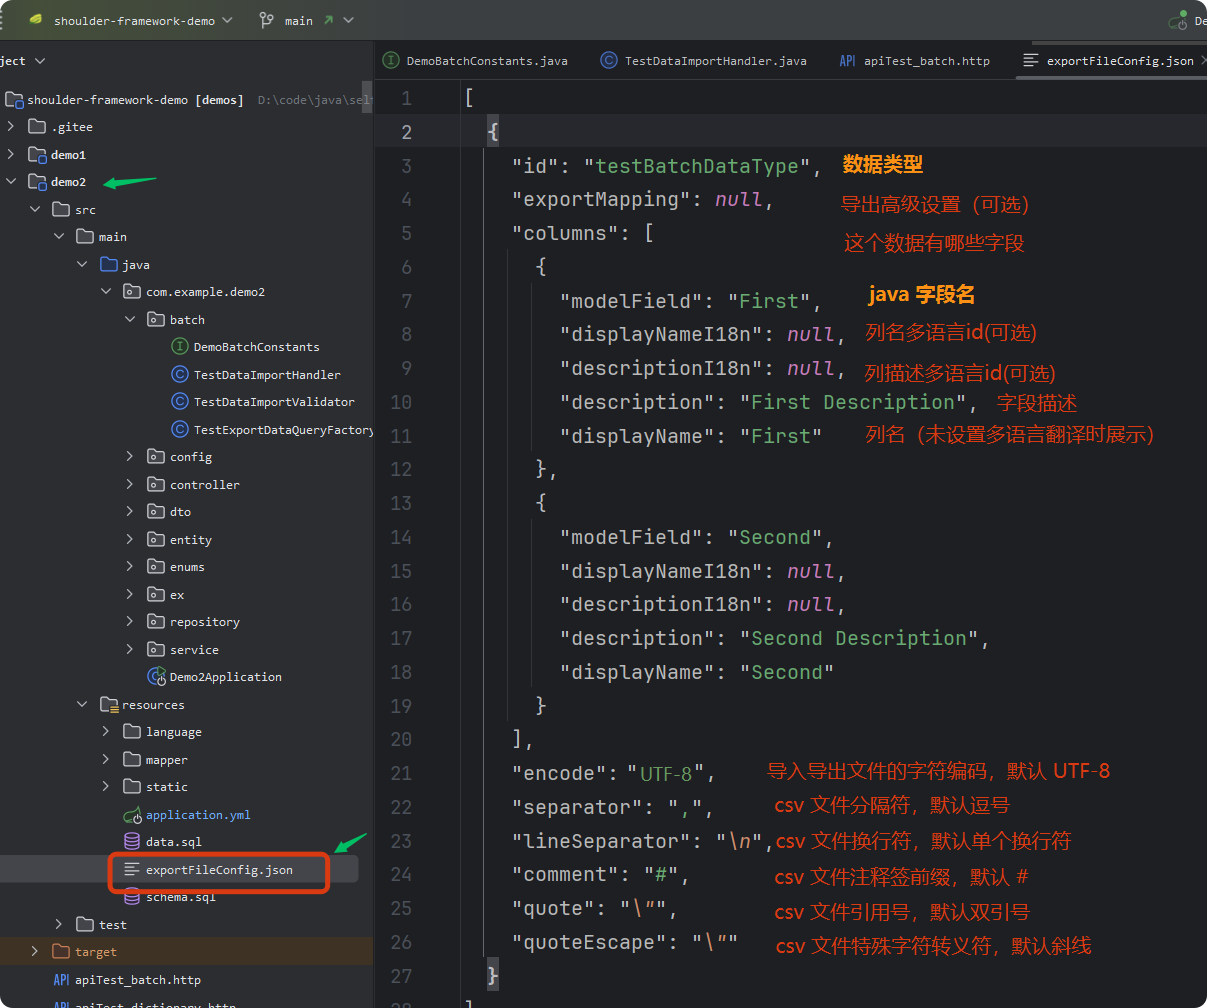
export-file-config-locations: classpath:exportFileConfig.json在 resources 目录创建 exportFileConfig.json ,定义导入导出使用的模型,这里最关键的配置是模型的 id 和字段声明(columns)。

这样就能轻松实现导入导出功能啦,记住这个模型id(testBatchDataType),继续往下看感受开箱即用的惬意吧。
|
导入数据
完整的批量数据导入数据其实是一个较为复杂的逻辑处理过程,包含了以下几个流程:
-
确认数据模型
-
下载导入模板
-
待校验
-
校验中
-
查询校验进度
-
校验完成(可能有成功、失败、以及特殊的如数据重复)
-
触发导入
-
执行导入校验通过的数据
-
查询导入进度
-
导入完成(可能有成功、失败)
-
查看历史导入记录
-
查看某条数据的导入状态
| 不用担心,Shoulder 几乎帮你完成了 90% 的工作,你只需专注于校验逻辑、保存逻辑即可 🤭。 |
1.下载导入模板
GET 请求访问 http://localhost:8080/api/v1/batch/testBatchDataType/template/download 即可获得一份按照您定义的数据导入模板。
| 再也不用怕使用者上传的文件和格式乱七八糟啦 😊。 |
2.上传待导入文件并校验
你的校验逻辑你来定义,只需要实现 BatchTaskSliceHandler 接口,声明支持的处理任务,实现校验逻辑,注入 Spring 容器上下文即可。
@Component
public class TestDataImportValidator implements BatchTaskSliceHandler {
@Override
public boolean support(String dataType, String operationType) {
// 如: 该处理器适用于 用户数据批量导入并校验 这个操作
return "testBatchDataType".equals(dataType) && "IMPORT_VALIDATE".equals(operationType);
}
@SneakyThrows
@Override
public List<BatchRecordDetail> handle(BatchDataSlice task) {
}
}
在使用时,通过 POST(form)请求,传入待校验文件,访问 /api/v1/batch/testBatchDataType/validate 即可,服务器收到后会返回 validate_batch_id 用于查询校验处理进度。
详细请求报文参见 demo2 示例工程,可直接运行并查看。
|
4.确认并开始(导入)
这里最重要的就是如何保存你的数据,实现 BaseImportHandler 接口注入 Bean 即可。
@Component
public class TestDataImportHandler extends BaseImportHandler {
public TestDataImportHandler(BatchRecordDetailPersistentService batchRecordDetailPersistentService) {
// 只需要根据模型id修改 testBatchDataType 即可
super("testBatchDataType", Operations.IMPORT, batchRecordDetailPersistentService);
}
@Override
protected List<BatchRecordDetail> updateData(List<BatchRecordDetail> toUpdateList) {
}
@Override
protected List<BatchRecordDetail> saveData(List<BatchRecordDetail> toImportList) {
}
}
写好代码后,想要触发导入时,只需要 POST http://localhost:8080/api/v1/batch/testBatchDataType/advance (推进处理阶段)即可,请求报文示例:
POST http://localhost:8080/api/v1/batch/testBatchDataType/advance
Content-Type: application/json

{
  "batchId": ... 批处理任务id
  "dataType": ... 数据模型id
  "currentOperation": ... 该批处理id对应任务当前的操作
  "nextOperation": ... 下一步要干什么
  "updateRepeat": ... 是否更新重复数据
}
该接口将返回 import_batch_id 用于查询导入进度。
5.查询进度(导入进度)
和查询校验进度类似,替换 validate_batch_id 后 GET 访问以下接口即可查询处理进度。
| 有了 Shoulder-Batch,开发导入导出功能,只需要定义好模型、确认校验、处理逻辑,就实现了以上复杂的功能,真是太省心啦! |
聪明的读者已经发现,Shoulder 为了更便捷的开发体验,将 校验数据、导入数据 都看作是 批量处理,校验进度查询、导入进度查询 都视为 处理进度查询,经过这样巧妙的抽象后,你会发现这个框架不只是导入导出的神器,对于所有的上传文件批处理操作都很适用,甚至不再拘束于文件上传。您可以借助此功能,轻松实现批量甚至多阶段批量任务,如:上传一批 Url 触发爬虫、从数据库分批读取一些评论 AI 分析用户感情再给用户批量打标等。并能在这些复杂流程中,轻松定位海量数据中每条数据的处理状态。
|
导入记录管理
2.列出某次导入详情列表
POST http://localhost:8080/api/v1/batch/testBatchDataType/record/detail/list
{
"businessType": "testBatchDataType",
"batchId": "{{import_batch_id}}"
}
导出数据
在导出时,除了已经确认的模型是什么,最关键的就是查询逻辑了,因此实现 ExportDataQueryFactory 接口,并注入 Bean 即可。
@Component
public class TestExportDataQueryFactory implements ExportDataQueryFactory {
@Override public boolean support(@NotNull String businessType, PageQuery<Map> exportCondition) {
return "testBatchDataType".equalsIgnoreCase(businessType);
}
@Override
public List<Supplier<List<Map<String, String>>>> createQuerySuppliers(@NotNull String businessType,
PageQuery<Map> exportCondition) {
}
}
| 太好了,您已经实现了导入导出数据了,接下来就是展示给用户了,发挥您的想象设计一个好看的前端页面吧!😎 |
AI 流程可视化
假设我们是一个 AI 搜索的开发者,当用户询问 “Shoulder-Framework 是什么?”,原生 AI 大模型无法准确回答他不了解或者不熟悉的东西,自然无法回答用户问题。
| 我们作为 AI 时代的技术者,希望我们的 AI 可以像我们一样聪明,自动去搜索引擎搜索相关数据,然后给出回复,以使我们的 AI 更强大,吸引更多用户。 |
我们通常会引导 AI 将一个未知的问题按步骤一步步思考解决,如下:
-
接收用户输入:“Shoulder 是什么?”
-
调用大模型 AI 识别用户真实意图,并改写任务为:“1. 通过搜索引擎查询 Java 技术栈中 Shoulder 是什么? 2. 阅读查询结果并进行分类与总结。3. 给出适合的使用场景与使用示例。4. 给出参考文档以便用户使用。5. 猜测用户还想问什么问题,引导用户继续提问。”
-
在网络搜索并总结查到的信息。
-
总结信息
-
回答用户
可以发现我们的AI回复质量更好,更聪明,但回答过程可能比较耗时,如果不及时给出回复,使用者并不知道要等多久并因此放弃,这非常可惜!
借鉴 DeepSeek、Manus 的产品思维,将漫长的过程可视化,让用户知道 AI 正在进行非常牛逼的思考,值得一等。
快速入门
你只需在你的 Shoulder 工程中加入以下2个类即可拥有一个简易的可视化 UI。
一:定义你的流程
/**
* <a href="http://localhost:8080/ui/activities/page.html?progressId=_shoulderMockAndTest&activityId=MyAiFlow"></a>
*/
public enum MyAiFlow implements BatchActivityEnum<MyAiFlow> {
TASK_1("👂", "识别用户意图", 0, 0),
TASK_2("🧠", "改写查询、扩写查询", 0, 0),
TASK_3("🔍", "查找相关数据", 0, 0),
TASK_4("🧠", "总结信息", 0, 0),
;
}
| 先忽略上面后两个字段 '0, 0',稍后在高级部分介绍。 |
在配置中注册这个类
@Configuration
public class BatchConfiguration {

    @Bean
    public BatchActivityEnumRepositoryCustomizer batchActivityEnumRepositoryCustomizer() {
        return repository -> {
            repository.register(MyAiFlow.class, "MyAiFlow");
        };
    }
}
打开 http://localhost:8080/ui/activities/page.html?progressId=_shoulderMockAndTest&activityId=MyAiFlow 即可访问到可视化页面,并看到一个示例效果。
管理你的流程
流程定义有了,如何让代码的真正的实时运行状态呈现呢?也非常简单,只需要在你的枚举中 .start / .finish 即可。
public class DemoController {

    @GetMapping("chat")
    public String chat(String userInput) {
        String progressId = UUID.randomUUID().toString();
        // 开启异步线程处理,并直接返回处理进度页面
        Threads.execute("enhancedAiProcess", () -> enhancedAiProcess(userInput, progressId));
        return "redirect:/ui/activities/page.html?progressId=" + progressId + "&activityId=MyAiFlow";
    }

    public String enhancedAiProcess(String userInput, String progressId) {
        // 收到用户输入,解析用户意图
        MySimpleTaskEnum.TASK1.start(progressId);
        String userIntent = AiClient.analyzeUserIntent(userInput);
        MySimpleTaskEnum.TASK1.finish(progressId);

        // 改写查询、扩写查询
        MySimpleTaskEnum.TASK2.start(progressId);
        String rewriteQuery = AiClient.rewriteUserInput(userInput, userIntent);
        MySimpleTaskEnum.TASK2.finish(progressId);

        // 让 AI 去网上搜索
        MySimpleTaskEnum.TASK3.start(progressId);
        String aiWithSearchedResult = AiClient.chatWithTools(rewriteQuery, List.of("WebSearchTool"));
        MySimpleTaskEnum.TASK3.finish(progressId);

        // 根据用户输入、意图、查找结果 总结信息返回用户
        MySimpleTaskEnum.TASK3.start(progressId);
        String finalOutput = AiClient.summary(aiWithSearchedResult, userIntent, userInput);
        MySimpleTaskEnum.TASK3.finish(progressId);

        return finalOutput;
    }
}
加入进度条
配合设置处理总数,就可以渲染一个带进度条的任务了,并且自动根据处理耗时预估完成锁续时间。
public class Demo {

    public void process() {

        MySimpleTaskEnum.TASK1.startOneStageTask(progressId);
        Thread.sleep(1000);
        MySimpleTaskEnum.TASK1.finish(progressId);

        MySimpleTaskEnum.TASK2.setTotalAndStart(progressId, 3);
        Thread.sleep(1000);
        MySimpleTaskEnum.TASK2.addSuccess(progressId);
        Thread.sleep(1000);
        MySimpleTaskEnum.TASK2.addSuccess(progressId);
        Thread.sleep(1000);
        MySimpleTaskEnum.TASK2.addSuccess(progressId);

        // ...
    }
}
高级使用 【装修中,等待发布】
使用方式右下角咨询作者吧~
并行任务可视化(高级-选修)
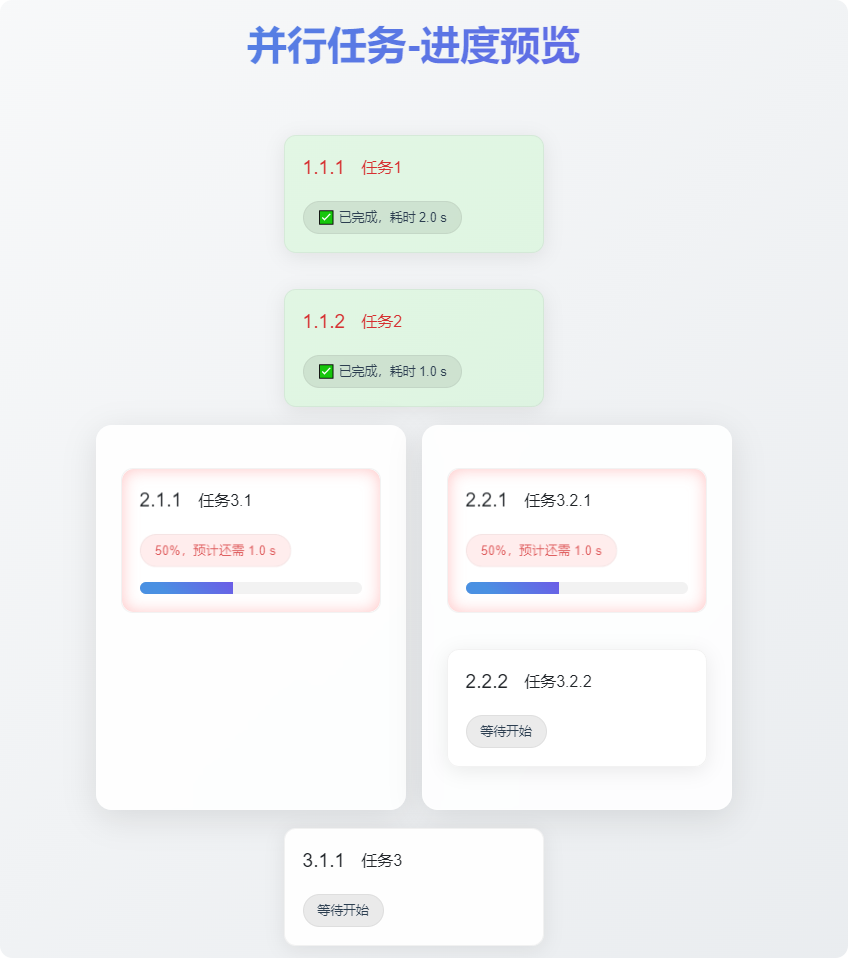
如果我们遇到的任务需要并行处理,Shoulder 默认的 UI 页面也可以轻松支持,只需要在枚举中设置布局即可,示例如下:
/**
* <a href="http://localhost:8080/ui/activities/page.html?progressId=_shoulderMockAndTest&activityId=MyAiFlow"></a>
*/
public enum CurrentFlow implements BatchActivityEnum<CurrentFlow> {
// 这两个任务在 第1个块,第1列(列数相同代表顺序布局)
TASK_BLOCK1_MAIN_1("1.1.1", "任务1", 1, 1),
TASK_BLOCK1_MAIN_2("1.1.2", "任务2", 1, 1),
// 这个任务在 第2个块,第1列
TASK_BLOCK1_MAIN_3("2.1.1", "任务3.1", 2, 1),
// 这两个任务在 第2个块,第2列
TASK_BLOCK1_MAIN_4("2.2.1", "任务3.2.1", 2, 2),
TASK_BLOCK1_MAIN_5("2.2.2", "任务3.2.2", 2, 2),
// 这个任务在 第3个块
TASK_BLOCK1_MAIN_10("3.1.1", "任务3", 3, 0),
;
// 别忘了注册 BatchActivityEnumRepositoryCustomizer
}
真棒,学的很快!打开示例页面,即可看到你已经创建了一个更高级任务!

| 通过灵活调整 blockNum 和 columnNum,也可以把复杂任务(多个子任务,可能存在依赖关系、子任务之间可能并发执行)轻松可视化,尝试一下吧。 |
更换UI界面
| Shoulder 所有的默认 UI 页面都可以自定义哦 😊 |
Shoulder提供了默认的 UI,如果您使用更精美的 UI 或者 需要定制自己的 UI,您也可以轻松实现。
国际化
您可使用特殊格式的 i18nKey 代替实际文本,并在展示时还原为需要的语言。操作日志中以下字段支持国际化。
参考 Shoulder-国际化说明,新增对应语言资源文件即可。
以中文为例,只需要在 reousrce/language/zh_CN/userModule.properties 中加入对应配置即可在查询时做对应的翻译展示,其他语言同理。
batch.file.user.name=昵称
batch.file.user.name.desc=用于在页面上展示的用户昵称
batch.file.user.sex=性别
batch.file.user.sex.desc=该用户的性别,可选:'男','女'